
Basic video editing
In MCOM 10, you’ll use Adobe Premiere for basic video editing. You will learn how to manage media, import content, cut clips and assemble video in a timeline.
Step 1: Opening Adobe Premiere
 There are two ways to access Adobe Premiere.
The first is through a desktop folder called “Applications.” In it, there’s a sub folder called “Adobe Premiere.” Open the folder. You will see the purple icon that looks like a periodic table of elements number. Double click that.
The second is through the iMac hard drive. Double click hard drive. Then navigate to the applications folder. In it, there’s a sub folder called “Adobe Premiere.” Open the folder. You will see the purple icon that looks like a periodic table of elements number. Double click that.
NOTE: The load time for Premiere will differ depending on the computer you’re at. The computers in Shima 203 and 204 have differing amounts of RAM depending on the year purchased. The smaller machines in Shima 203 are the newest with fusion drives.
Step 2: Set up your project
 On start up, you will be prompted with a welcome screen. The computers in Shima 203/204 are in Deep Freeze, so you likely won’t see anything listed in Open a Recent Item.
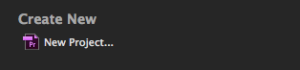
To start a new project, click on New Project under the Create New header.
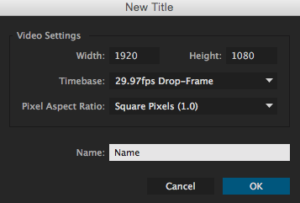
A new window will appear with the header New Project. It will ask you the location in which you want your project to go. You will be saving your project to your folder on the MCOM drive.
The navigation path look something like this: MCOM 10>Spring 2018>YOUR NAME FOLDER.
The screen will look similar to this, but will include a different path:
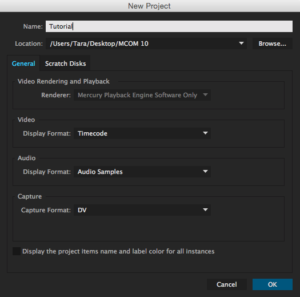
A few things to note: On the general tab, you will see drop downs for various changes to your project.
Video: The display format should always be set to “Timecode.”
Audio: The display format should be set to “Audio Samples.”
Capture: You can choose between “DV” or “HDV.” This was more important when video could be “captured” via a wire plug-in to your camera. If you know your footage was shot in high-defintion video, make sure to select that option. If you don’t know, leave it as it is, Premiere will prompt you if your footage is different from the timeline you’ve chosen to place it on.
Name your project first. Your project name should be something to indicate the content of your work.
Then toggle to the Scratch Disks tab.
What are Scratch Disks?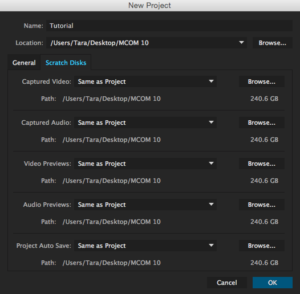
Scratch Disks are the locations in which you want your content to be saved. If this was your at-home computer, you’d likely ave to a general video folder somewhere in your system. That sort of file management doesn’t easily allow a project to be shared because tentacles of videos are all over those files. It’s hard to extract one file from another if you want to move a project.
This is especially true on computers like ours where you can’t save.
Instead, reset ALL the Scratch Disks to your folder on the MCOM 10 drive. This will allow you to access your project from any of the networked machines in Shima 203/204.
You want to make sure all your scratch disks are set in the same place as your project. You’ll also want to make sure, in terms of media management, that your footage (raw video from the camera) will be located there as well.
A note on Media Management
Media management is important in this class. You can’t have your footage (raw, uncut clips) in random folders all over the place. You need to keep all your video content in the same folder. You want your scratch disks to be the same for everything in order to potentially MOVE your project to another computer, or to take it with you.
You will not need to move your project to another computer in this lab. If you plan on editing here AND at home, you may want to save your project to an external thumb or hard drive to make it easier to move between locations. Be sure to backup your content.
Always have a backup.
Four windows will then load onto the screen.
Step 3: Familiarizing with the workspace
You will see six windows when Premiere opens: Project, Program Manager, Source Monitor, Timeline, Audio Meter and Tools.
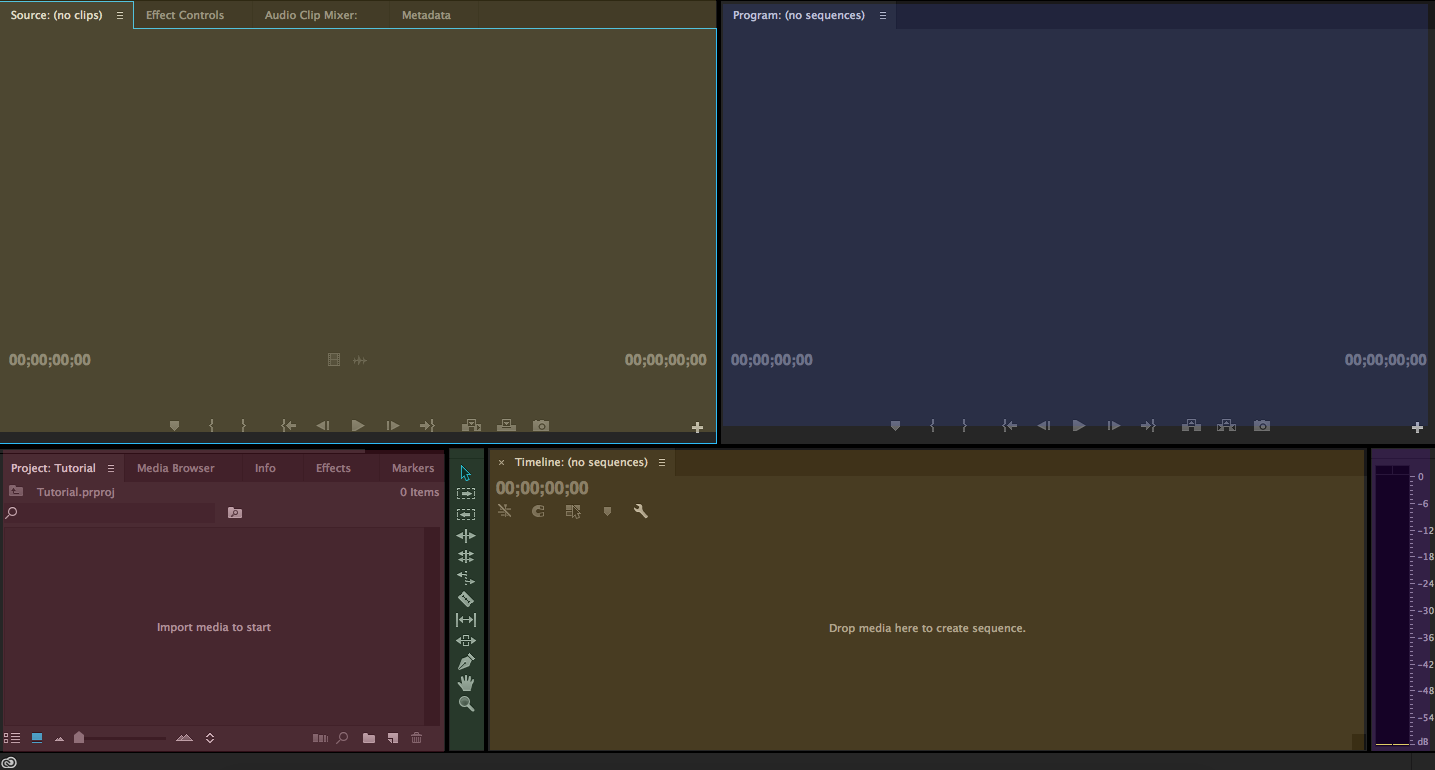
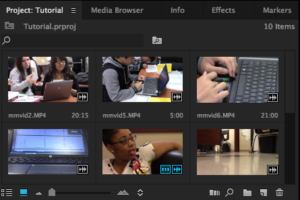
Project: This is where your clips will “live.” You will import footage (remember, the raw video) into Premiere and it will display here. You will also house photos and lower third titles here.
Source Monitor: The location you’ll be able to view and clip that raw content before moving it down to the timeline
Timeline: The area where you’ll be arranging your clips to make them into a movie. The clips placed here will be exported to make your movie.
Program Manager: The viewing window for your timeline area. If you put a clip in the timeline and want to play it back, you will see it in the Program Manager area.
Audio Meter: The window where you’ll be able to see the levels of your audio. Typically audio meters show green for good, yellow for borderline and red for “you really shouldn’t use this audio at all.”
Tools: Probably the most important window, the tool bar is allows you to edit in the timeline area and fine tune your video.
The Tool Bar

Selection (Arrow): Premiere’s default tool, which allows you to make selections in the timeline area.
Track selection (Arrows surrounded by boxes with hash lines): Allows for a selection from a certain point. Also allows for a selection of multiple tracks.
Ripple edit (Line with an arrow on either side): Adjusts and moves tracks to an edit point. A ripple delete will bring your tracks together instead of having an empty space in between the tracks when a clip is deleted.
Rolling edit (Line with two sets of arrows on either side): Allows for adjusting between tracks without impacting other parts of the timeline.
Rate stretch (Line with arrow, one near top, one near bottom): Allows for changing of duration of a clip while also changing the speed of a clip.
Razor: Allows for clipping of a clip on the timeline of both video and audio.
Slip (Double arrow trapped inside two lines): Changes a clips in and out points at the same time, so the timeline is not impacted.
Slide (Double arrow with box inside of it): Allows for moving of clips back and forth while adjusting clips to compensate for the move.
Pen: Allows for creation of anchor points, especially important in audio editing within Premiere.
Hand: Allows editor to move clips back and forth. Also allows user to drag timeline back and forth.
Zoom: Allows for more fine-tuned editing, especially with audio.
Step 4: Importing your footage
To import the demo content, or any content into your project, you’ll do so by selecting File>Import from the main task bar at top.
A note on Media Management: Remember that your footage and project should be in the same folder. Also note that you should have reviewed your clips BEFORE bringing them into the project. Please rename your clips for this course. It will be easier for you to find what you need if you’ve done an inventory of your clips and renamed them before importing.
Navigate to the folder your footage is in. Click the first clip and then hold down Shift (while still holding on the first clip), then click the last clip. That will select all the clips in your folder. Click Import to pull the clips into the project.
Your clips will import into the project window. The clips will be placed in alphabetical order.
Note that the project window is more than just clips. You can also browse other media through the Media Browser and add Effects through that tab.
Step 5: Viewing clips
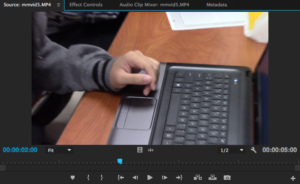 To view the clips you’ve imported, double click on one of them. The clip in its entirety will appear immediately above in the Source Monitor window.
You will be able to play the clip using either the Play button, or by tapping the space bar. The space bar is a universal play control. If you are in a window where video is present, tapping the space bar will play the content.
Note the toolbar at the bottom of the window.
From left: Add Marker, Mark In (I on keyboard), Mark Out (O on keyboard), Go to In, Step Back 1 Frame, Play, Step Forward 1 Frame, Go to Out, Insert, Override, Export Frame
The Mark In and Mark Out points will help you edit your clips to move them into a timeline.
Step 6: Editing clips
To edit your clip, watch through it. Then add Mark In and Mark Out points either by using the toolbar on the Source Monitor or using your keyboard’s I and O keys to set points. Once your clip is edited down into a clip you like, you area ready to move it to create a sequence.
Step 7: Creating a sequence
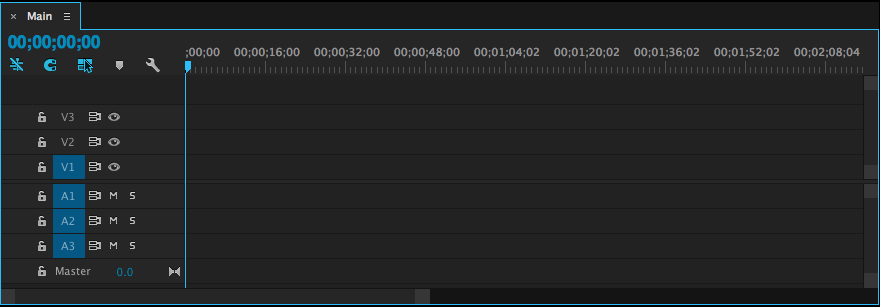
Notice that the Timeline area has nothing in it. Let’s change that.
You will be tempted to drop clips there from the Project area. Don’t do that. You will run into problems in Premiere if you try to edit on a clip from the project.
Instead, you need to create a new Sequence. Go to File>New>Sequence.
A screen will pop up with a bunch of codec information, all of which looks incredibly complicated if you don’t know a lot about video cameras and editing. Premiere has taken the guesswork out, though, so that when you move the clip, it will adjust based on YOUR footage. So for now, we’ll ignore this window.
Once you become a more skilled editor, you will understand this codec information better.
Title your Sequence for what you hope the video will be: Main, Focused, etc.
A new window will appear in the Timeline. You can see it has room for audio/video tracks. It will look like this:
Go back to the Source Monitor window where the clip you edited is located. Drag it down to the Timeline.
Premiere will prompt you to Change Sequence Settings or Keep Existing Settings based on the footage. For footage from the Canon Vixia camera click Change Sequence Settings and continue.
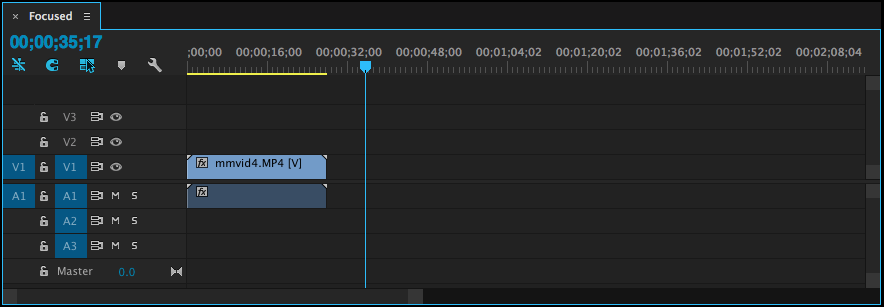
Your video will now be in the Timeline. This is the area where your project will come together.
You may continue editing your clips by first taking your clips into the Source Monitor and inserting Mark In and Mark Out points. You then pull them into the timeline.
Step 8: Editing a longer clip/interview
You will likely have at least a few interviews where you recorded through multiple questions. Best practices would have you stopping the camera with each question to create a new clip. That doesn’t always happen, though.
If you have a 10-minute clip, you want to separate into multiple clips for your Timeline, do a right click on it in the Project window. Use Duplicate to create another copy of the clip in the Project viewer. This will allow you to set Mark In and Mark Out points in different places within the clip.
Step 9: Editing on the Timeline
Once you bring a clip down to the Timeline, you can adjust the duration of it by hovering over the beginning or end of it. A red tool mark will appear. You can slide the marker back and forth by holding the left button of your mouse down.
You may also use the Razor tool to cut a clip. The clip will cut and leave the rest of the clip in place. You can use your Delete key on the keyboard to remove the part of the clip you want to get rid of.
You may move your clips around by using the Selection tool and dragging the clip around the timeline.
Step 10: Adding a lower third
A lower third title is an element where you’ll be adding your subject’s name. These are easy to create and serve the purpose of being visually attractive while providing information.
The best part: Once you create a lower third you like, it’s easy to duplicate it and use it again and again. All you have to do is change out the names and information.
 To create a new lower third title, navigate and select Title>New>Legacy Title.
A screen will appear on top of the edit work space you’re now used to seeing. For best results you should build your lower third on top of A-roll, which is the interview portion of your footage.
You’ll be prompted with the window seen on the right.
In the Name area, type in the name of your subject. This will help you find the lower third easily if you need to change it.
The build window looks like this:
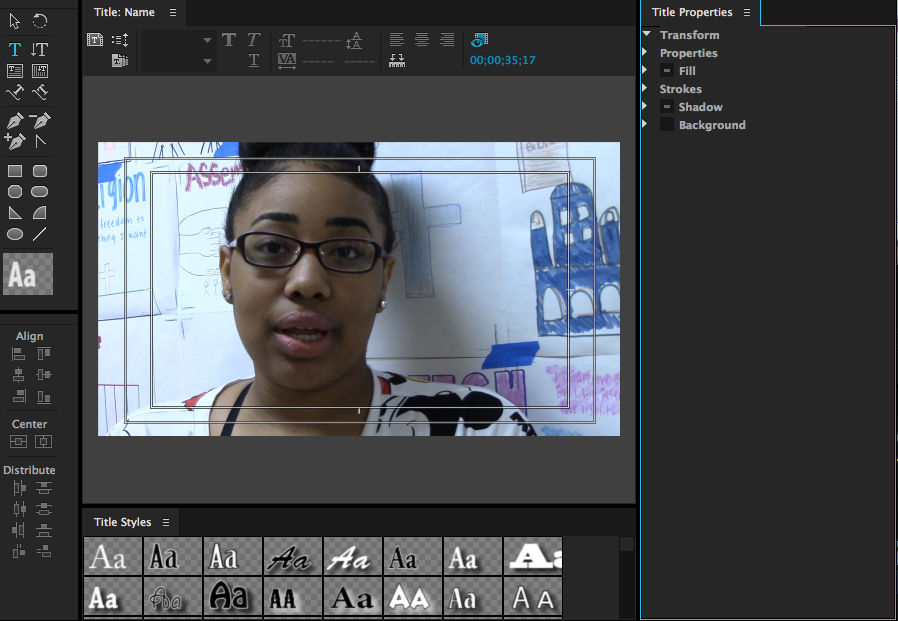
Notice the build area. There are preset Title Styles, most of which will NOT work for your project.
This setup is a WYSIWYG: What you see is what you get. You can draw a box. You can center content. You can move things around pretty easily. On the left-hand side, under Title Properties, you may adjust the elements.
Let’s draw a black box using the rectangle tool. Click on the rectangle. You should see a white box appear below it. Click on that and change the color to black using the Fill tool under Title Properties.
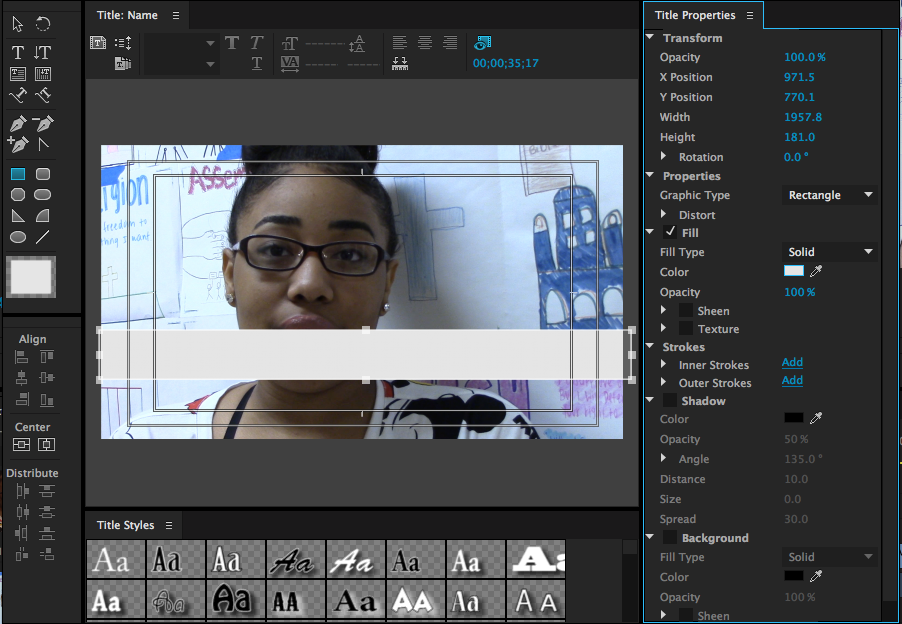
You can change the Opacity to 70 percent, either using your mouse to move the numbers back and forth or by clicking the number and typing in the 70.
This Title area works in layers. You can add and subtract layers to it.
Next, add Text by clicking on the Text tool. It looks like a T. Draw a text box. Type in Jane Smith. Again, you may change the styling in the Title Properties area. The Text tool will automatically load for two lines, a name and a title. Consider how standard titles work on news shows you watch.
Also note that you don’t have to add motion or anything to that effect for this course.
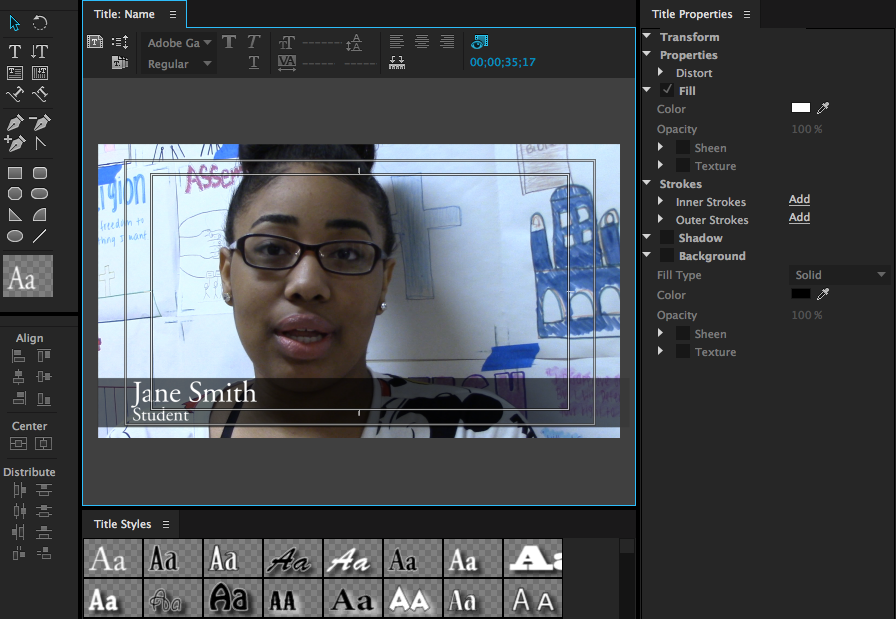
You may adjust the font size on one line and not the other by highlighting the text.
It may take you a little while to style your lower third, but once you are comfortable with one, you don’t need to recreate it.
The Title will save to the Project area. If you do a right click, then select Duplicate you will create a New Title you may edit that will retain the settings you’ve created and applied to the first one.
To change the name on the NEW Title, click the name that says Name Copy 01, or generally Copy of whatever you’ve called the original name. It will allow you to rename the lower third whatever you like to. Best practices would have you name it whatever the person’s name is you’re putting the lower third over.
To use the Title, drag it into the Timeline and put it ON TOP of the video interview. It will show pink to indicate it is a Title.
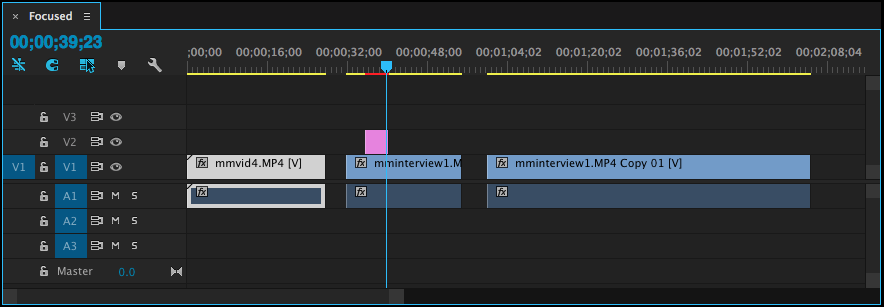
You can see the Title in pink on top of the video above. The Title slide will always be the highest on the hierarchy of clips, otherwise it will be hidden. Premiere works in layers, the highest layer displays over the lowest.
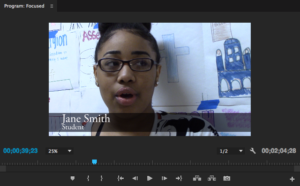
On playback in the Program window, you will see it appear as well.
You can have a basic Title, or add more shapes and make it more complicated. You should always include name and title of the person, by job or profession, etc. to make your Title complete.
Remember that your video doesn’t have to be perfect, but it needs to be functional. Make sure to take out gaps between clips and and remove awkward pauses as you edit to make your video better.